
I’ve re-installed my Pi’s SD card storage more times than I care to recall. New cards, programming glitches, messing with Linux’s settings files – all of these reasons have forced me to go through the process of re-flashing the Pi’s storage card. That’s bad enough – what’s worse is having to re-download the applications I’d added since the previous install, applying updates and choosing again all of my system preferences.
What I should have done was clone my card, allowing me to re-flash the SD card with a complete, working and configured to my personal satisfaction Pi operating system.
I don’t know why I didn’t do this. I suppose Mac OS X’s inability to cope with the Pi’s EXT4 file-system was the main reason: I can’t simply drag and drop the card’s contents, first to the Mac and then, later, back to a freshly formatted card. But a little Googling set me on track to use the next best thing: the dd command, available in OS X – and Linux for that matter.
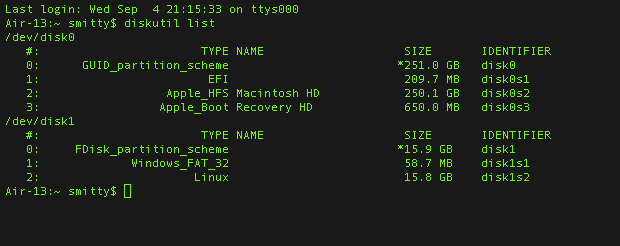
So clone the Pi’s SD card, slip it out the Pi and into a Mac. Open the Mac’s Terminal app and first enter the command:
diskutil listThis will give you a list of the disks and volumes inside or connected to your computer. The Pi SD card will contain a Linux partition under TYPE NAME:
Now you’re ready to duplicate the SD card, saving it as a disk image file on your hard drive:
sudo dd if=/dev/rdisk1 of=~/Desktop/pi.img bs=1mThe if stands for ‘input file’, in this case the SD card. diskutil will list it as /dev/disk1 – prefix ‘disk’ with ‘r’ to point to the card’s raw storage space to speed up the process: /dev/rdisk1.
In the next section, of stands for ‘output file’, here a new file, pi.img which is to be place by dd on my desktop. Remember, ~ is the Unix symbol that represents your home directory.
Finally, bs for ‘block size’ – I’ve chosen 1MB, or 1m as dd prefers it. You’ll need to prefix the dd command with the sudo command, and this will first ask your for your Mac admin password. If you’re a Pi user, you’ll likely be used to sudo. When you’ve entered your password, the duplication process will begin. Depending on the capacity of your SD card, it could take some time. While the back-up is being made, all you’ll see in the Terminal is a flashing cursor, but you can get some feedback by looking at the size of the pi.img file on your Desktop.
WARNING Always make sure you check these values carefully – get them wrong and you can wreck the data on your hard drive. Don’t, for instance, key in the wrong /dev/disk entry from the diskutil list. If you accidentally tell dd to copy the wrong disk or copy the SD to your hard drive, it will merrily go ahead and do so. It won’t check to see if you’re happy for it to proceed. Don’t copy my examples exactly – the input and output file locations may be different on your system.
Re-flashing the SD card from the image is just a matter of swapping around the input file and output file values to read from your .img file and write to the card.
Now, pi.img in the example above is large. You can compress it afterwards by right-clicking and selecting Compress “pi.img”, but it’s more efficient to compress the file as you go. To do this, you use the Unix ‘pipe’ symbol, | , to route the output of dd not to a file but to the gzip utility:
sudo dd if=/dev/rdisk1 bs=1m | gzip > ~/Desktop/pi.gzRe-flashing the SD card then becomes:
gzip -dc ~/Desktop/pi.gz | sudo dd of=/dev/rdisk1 bs=1mUpdate Note that you’ll need to unmount – but not eject – your SD card before you can write to it. So enter diskutil unmountDisk /dev/disk1 to do so. Now you’re ready to run the restoration using the command sequence in the previous paragraph.
I got my 16GB SD card down to a 1.48GB .gz file, small enough to keep safe on a USB stick I had kicking around. Depending on how big your SD card is and how much data you’ve put on it, your mileage may vary.
PS. If you’re reading this but you’re not a Mac user, Lifehacker has instructions for Windows. Backing up the Pi SD card on a Linux machine is an almost identical process to the Mac one. The difference: the SD card will be listed as /dev/sdx-something.
PPS. If you’re reading this but you’re not a Raspberry Pi users, what are you waiting for? Go and buy one! Here’s a nice set comprising the Pi and a stack of handy accessories.

Thanks a lot from Italy! Very helpful tutorial 🙂
Hey I think in dd , when backing up PI SD img’s you should be using ‘ 1M ‘ – capital M. You want to have the traditional 1024 sized megabyte (which was renamed). Most tutorials for setting up SD images include the capital M in the dd command for blocksize. It is usually a good idea to rip the image @ the same blocksize in which you wrote it initially. The same size should be used when writing it back to a new SD.
As for shrinking the image, you can usually open the SD in an app like Gparted (linux), or a Windows/Mac equivalent, and shrink the large partition down to a more manageable level. Then you can dd the img, and it will be smaller. After dd is complete on the new SD, open Gparted again and expand the larger partition to its full size. There ya go!
Or just download “etcher” (for Mac, Windows, or Linux) or Apple Pi-Baker (for Mac) and do the same thing from a user-friendly graphic interface, rather than having to remember the appropriate command line entries.
Hi all – just to add that to monitor the copy progress with dd, you can also use the Mac Activity Monitor, click on “Disk”, and then just monitor how much data “dd” has copied over.
Great explanation of what the bs and rdisk (rather than disk) stands for. Been using this line many times to flash a raspi SD card but never really understood the need for the r in rdisk. Thanks a bunch.
Quick tip: control + t will give you an update on the progress (if you’re impatient like me)
For the Linux novice, should include a first step of gracefully shutting down the Pi.
[b]sudo shutdown -h now[/b]
Don’t want to corrupt the card as your trying to remove it and back it up!
great tutorial thanks m8
I have been banging my head against the wall with this working sporadically when creating a new SD image from the backup. Finally figured it out and thought I would share. I tracked down through process of elimination that if I copy and paste the command gzip -dc ~/Desktop/pi.gz | sudo dd of=/dev/rdisk1 bs=1m from a PDF I made of this article for reference, the command would fail with a “gzip: can’t stat: -dc (-dc): No such file or directory” error. It turns out that when pasting the command into OS X Terminal the hypen before “dc” is not being recognized properly. If I manual type the command, or copy and paste then move my cursor and delete the hypen before “dc” and retype it from my keyboard it works fine. Maybe someone else can explain exactly what is going on here. Hope this helps someone!
Another thing that might be happening for the ones that did clone the sd card to a file, and then they have problems booting the card when writing back the image file to the card:
When you insert the sd card in the computer, check to see if the boot partition is mounted. I unmount that first, and then I chose to clone the card. If not, then the boot partition might not get cloned to the file, so that’s where the booting problems might originate.
I’m not sure, just a thought. I just noticed that when I insert the card in the laptop, the boot partition mounts.
Just hit CTRL+T while the copying happens, you’ll get an instantaneous progress report. You can spam it as much as you like.
You’re welcome 🙂
Great clear, well explained instructions. People often just say do this code etc, without explaining what it does. When you understand what some code does its easier to troubleshoot and adapt for your own situation. Well Done!!
Pingback: RaspberryPi 2 Model B SD Life Extender | Gioorgi
Hi,
I did everything as presented reading to and writing from a gz file directly. Input was a 32GB Samsung SD card, output a 32GB Sandisk SD card, which I unmounted before writing it (and was FAT32 formatted already). No errors at all. But couldn’t boot the rpi from the Sandisk card. What could be wrong? The file structure on the Sandisk card seems to be the same. I’m not running Yosemite.
I’m running Yosemite. This:
sudo dd if=/dev/rdisk2 bs=1m | gzip > ~/Desktop/pi.gz
produces:
-bash: user$: command not found
Whereas a copy/paste of that line, minus the “r” of “rdisk”:
sudo dd if=/dev/disk2 bs=1m | gzip > ~/Desktop/pi.gz
Seems to work. (No error messages and the pi.gz file has appeared on the desktop)
did they drop the command from the latest OSX?
Hi, Roger. I’m running Yosemite (10.10.2) too, and those commands work fine for me.
Make sure you run:
diskutil list
first. It may be that your inserted SD card is not /dev/disk2, and it’s this that is causing the error that you’re experiencing.
Also Yosemite here. I’ve just followed these instructions literally an hour ago, and it worked perfectly. Thanks smittytone!
Worth noting that Yosemite (10.10) appears to change the computer’s main disk from disk0 to disk1! So if you’ve just upgraded to Yosemite and you’re regularly running these commands, it pays to double check.
if you install pv you can do “sudo dd if=/dev/disk2 | pv | dd of=~/Desktop/sd.img” and see progress while copying.
Mac: “brew install pv”
FIXED! WEIRD issue with MBP and its internal SD card reader. It doesn’t like some of the SanDisk cards! Found a few threads of people not being able to mount them or being mounted as read-only. Mine was being seen as read-only. The fix was to move the write protect slider on the SD / microSD adapter 1/2 way between locked and unlocked. Sounds bizarre, but it is now seen as read/write and I am currently copying the disk image back over to it.
https://discussions.apple.com/thread/3034444?start=15&tstart=0
That’s a good tip. I’ve had problems with other card and card-reader combos were inserting the card catches and moves the write-protect tab, and I’ve seen it with both press-to-lock SD slots and more simple slots like the ones in the MBP and MBA.
But your experience will be very useful for other people who encounter the same problem. Thanks for sharing your solution.
I created the .img successfully from an 8GB microSD card. I cannot write back to a new 16GB microSD card. I unmounted both /disk1 and /disk1s1 and I am getting “dd: /dev/rdisk1: Permission denied”
Any ideas? Originally, /dev/disk1 & /dev/disk1s1 were root:operator. Even though I am running the command as root, I tried “sudo chmod root:wheel /dev/disk1” and the same for disk1s1 and it shows as root:wheel now… but even after unmounting again, I am getting Permission denied. No, the write protect is not on for the microSD card.
Any ideas?
Really nice and useful post! 🙂 Thank you.
Thanks, helped me a lot!
It’s worth noting, that if you want to monitor the progress of the process, you could use:
pgrep -l ‘^dd$’ <– to find the pid of the dd process and than run:
sudo kill -INFO PID_FROM_ABOVE <– to print the current progress
Only tried this on my Mac until now, but should work for Linux as well.
This will kill the process in the middle. May-be you should refrain for teaching that sort of nonsense.
Maybe you should refrain talking about things you don’t understand. If you had read the man page about the kill command, you’d know, that this is just a unix tool to send signals to processes. With -INFO he sends the SIGINFO signal to the dd process. This causes the process to drop some kind of status message. Unfortunately, this is nothing else than what the Ctrl+T shortcut does. Nevertheless it could be helpful when the process is running in the background or something…
Just wanted to thank you for a simple, yet incredibly helpful tutorial. Saved me a ton of time getting my RasPi back up and running after an update.
I’m very glad to hear it helped you, Brian.
Really useful tutorials – except the warnings that come after – not before – the user has copied the example 😉
Pefect, just what I wanted having got raspyfi running perfectly. Thankyou
Thanks for the guide!
So do I understand you right: I don’t need to write everything to an .img file, I can directly backup as .gz ?
That’s essentially correct. The .img file is compressed to .gz on the fly, and the restoration process auyomatically extracts the .img from the .gz file then uses it to re-write the card.
That is nice! I will try that right away, thank you very much 🙂
Very helpful! Thank you for posting this.
While dd is running, you can hit Control-T and learn the copy status.
Thanks for that tip! It’s good to be able to “see” something is actually happening!
Hi,
Thanks for these instructions but I am having a problem and was hoping you may be able to help!
I have successfully made the image using:
sudo dd if=/dev/rdisk2 of=~/Desktop/pi.img bs=1m
I am trying to write to a different SD card. After unmounting the original SD Card I inserted the new one which also is listed as disk2 using diskutil list in Terminal.
I input the following:
sudo dd if=~/Desktop/pi.img of=/dev/rdisk2 bs=1m
I then keep getting this error message and I don’t know why: dd: /dev/rdisk2: Resource busy
Any ideas?
Thanks in advance!
Hi, David. Let me ponder this. Meanwhile, have you seen Jeremy’s second comment? His ‘sudo’ trick may work for you too.
Hi Smitty,
Thanks for the response. I used Jeremy’s sudo unmount code and that worked perfectly. Thanks for your help!!
One of my images is 4GB which I restored to an 8GB SDHC card. I never expanded the partitions, etc., so I’m surprised that when I clone that 8GB card, the new image is 8GB (despite the partition table showing clearly a 3-ish GB partition with empty space at the tail). Have you come across a way to clone just the actual partitions rather than everything including the blank space?
saving the image worked great.
sudo dd if=/dev/rdisk2 of=~/Desktop/b001.img bs=1m
but it didnt work when i switch them
sudo dd if=~/Desktop/b001.img of=/dev/rdisk2 bs=1m
any ideas on why?
I’ll look into this, Jeremy. Did you take the card out of your computer between copy it and then trying to write the data back? If so, the second time, rdisk2 may not be correct. The number can change. Diskutil will tell you the correct rdisk value.
the issue was i didn’t unmount rdisk2s2. the code below fixed my issue.
sudo diskutil unmount /dev/disk1s1
Thanks for this post, all my efforts with my naff winblows machines failed until I booted up the Macbook Pro and it succeeded first time. I can now relax a little having a good quality backup image and go back to exploring the wonders of Pi!
Thanks for the well explained Mac/Pi instructions but your first line after the disk util list is incorrect and would image your 250GB internal hard drive 😦
sudo dd if=/dev/rdisk0 of=~/Desktop/pi.img bs=1m
should be:
sudo dd if=/dev/rdisk1 of=~/Desktop/pi.img bs=1m
Well spotted. It should indeed, in this case, be
rdisk1notrdisk0, though other users may see differentrdisksuffixes still. Moral: always checkdiskutilclosely. Oh, and proof-read your blog posts.