
Check out my retro tech T-shirt store
I love the design of the Sinclair ZX81. It was never a great computer, even in 1981. It only had 1KB of on-board RAM, it was slow, it was small, it could only do black and white graphics, and it’s membrane keyboard was useless for fast typing. But it looked fantastic: black, sleek and totally futuristic. Almost all other 1980s microcomputers now look very dated. No surprise there, of course, but the ZX81 still looks amazing.

Hats off to Sinclair Research’s industrial designer, Rick Dickinson, for devising a design that is genuinely timeless.

Technology has clearly evolved considerably since 1981 when the ZX81 was released. The Raspberry Pi is considerably more powerful, especially when it comes to graphics. I could buy and then use a second-hand ZX81, but why not combine its looks with the performance of the Pi? I’ve always had the notion that the ZX81 might make a stylish Raspberry Pi case, especially if I could make use of the keyboard. I don’t generally type on the Pi, I key in commands, and that’s not beyond the limitations of the ZX81’s membrane keyboard. Or so it seemed to me at the start.
But was it even possible to make use of an old, non-functioning ZX81 this way? I set out to see if it could be.

The Pi uses USB for peripherals, so clearly the ZX81 keyboard has to be capable of being bridged by some USB hardware. I’m no electronics expert, but Dave Curran of Tynemouth Software is. He figured out how to link a ZX81 keyboard’s connection cables to an Atmel ATMega32 chip of the kind found in various Arduino boards, and he wrote some code to read key presses and send appropriate signals out through a USB cable. Dave wanted to turn a ZX81 into a standalone USB keyboard rather than a Pi case, but his approach was clearly the starting point for my own efforts.
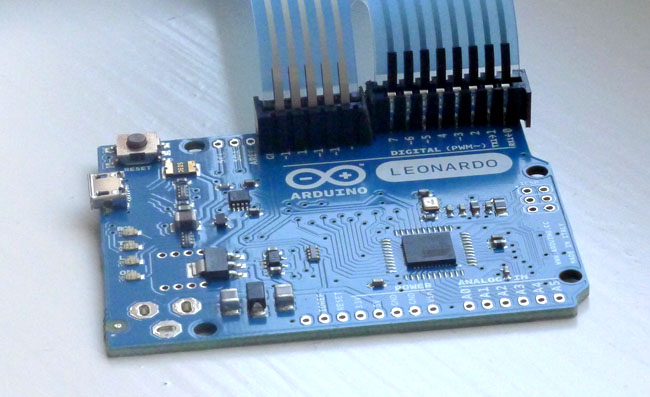
The ZX81 motherboard has two Molex connectors – one five-pin, the other eight-pin, respectively part numbers 22-02-3053 and 22-02-3083 – to take the two keyboard ribbon cables, one for the key matrixes rows, the other for its columns. My soldering iron skills aren’t up to detaching these connectors from the original PCB, so I bought a pair of fresh connectors from RWAP Software, which sells a number of replacement parts for various 1980s computers. RWAP lists them as ZX Spectrum parts, but they’re suitable for the ZX81.

Dave’s USB keyboard used the Atmel chip on a board of his own design. However, one standard Arduino board, the Leonardo, has a variant of the Atmel microcontroller which supports USB directly. It can also be powered by its USB cable. Better still, the Leonardo is available in a version without headers soldered on. Dave suggested using such a header-less Leonardo and soldering the Molex connectors straight on to its GPIO lines. This isn’t necessary but it has the advantage that it reduces the amount of space the board will take up inside the ZX81 case.
The two connectors aren’t a perfect fit on the Leonardo: their plastic armatures are fractionally too large to sit comfortably next to each other on the board. A little gentle glass-papering sorts that out. The eight-pin connector sits on the Arduino’s pins 0 through 7, mounted with the metal cable connectors facing the the board. The five-pin connector sits on pins 9 through 13, but this time the metal cable connectors face away from the board, as shown in the picture below.
Install the Arduino IDE for your platform, and then connect the Leonardo by USB cable. This process is explained clearly at the Arduino site, so I won’t cover it here. When you’re done, cut and paste Dave Curran’s Arduino control code into the IDE window and upload it to the Leonardo.
RWAP Software also sells newly made replacement ZX81 keyboards, so I bought one of these as well as the Molex connectors, in order to try out Dave’s technique before I plunged into eBay in search of suitably inexpensive old ZX81 to hold my Pi. I wanted to make sure it worked before committing my Pi to a new case, and since many non-functioning ZX81s also have flaky keyboards, it seemed prudent to have a replacement standing by. Why a non-functioning ZX81? Since I’n going to remove the internal components to make way for the Pi, why pay extra for a working unit?
Dave’s code is great, but there’s a flaw: it leaves out a fair few characters that are essential, especially for Pi use. I didn’t appreciate this until, having hooked up the keyboard to a newly booted Pi, I tried to do my usual sudo apt-get update. Dave’s code doesn’t trigger the hyphen! It’s not that the ZX81 keyboard lacks this symbol, only that Dave’s software only sends alphanumeric characters.
The ZX81 had a method for entering symbols: press the Shift and New Line keys to put the keyboard into Function mode. This enables the red characters on the keyboard. I was able to replicate this by adding a third table of characters to Dave’s code. This table is read in response to a key press made after Shift and New Line have been pressed together. This sets a flag which is reset once a third, follow-on symbol key is pressed, putting the keyboard back into normal, alphanumeric mode. I also needed to tweak Dave’s code to temporarily ignore the Shift key once the symbol-shift flag has been set. Cut and paste the following into the Arduino IDE to try this feature out:
| // ZX81 USB Keyboard for Leonardo | |
| // (c) Dave Curran | |
| // 2013-04-27 | |
| // Modified with Function keys by Tony Smith | |
| // 2014-02-15 | |
| #define NUM_ROWS 8 | |
| #define NUM_COLS 5 | |
| #define SHIFT_COL 4 | |
| #define SHIFT_ROW 5 | |
| #define DEBOUNCE_VALUE 250 | |
| #define REPEAT_DELAY 500 | |
| #define ALT_KEY_ON 255 | |
| #define ALT_KEY_OFF 0 | |
| // Keymap for normal use | |
| byte keyMap[NUM_ROWS][NUM_COLS] = | |
| { | |
| {'5', '4', '3', '2', '1'}, | |
| {'t', 'r', 'e', 'w', 'q'}, | |
| {'6', '7', '8', '9', '0'}, | |
| {'g', 'f', 'd', 's', 'a'}, | |
| {'y', 'u', 'i', 'o', 'p'}, | |
| {'v', 'c', 'x', 'z', 0}, | |
| {'h', 'j', 'k', 'l', KEY_RETURN}, | |
| {'b', 'n', 'm', '.', ' '} | |
| }; | |
| // Keymap if Shift is pressed | |
| byte keyMapShifted[NUM_ROWS][NUM_COLS] = | |
| { | |
| {KEY_LEFT_ARROW, '$', '\\', '@', KEY_ESC}, | |
| {'T', 'R', 'E', 'W', 'Q'}, | |
| {KEY_DOWN_ARROW, KEY_UP_ARROW, KEY_RIGHT_ARROW, '!', KEY_BACKSPACE}, | |
| {'G', 'F', 'D', 'S', 'A'}, | |
| {'Y', 'U', 'I', 'O', 'P'}, | |
| {'V', 'C', 'X', 'Z', 0}, | |
| {'H', 'J', 'K', 'L', KEY_F5}, | |
| {'B', 'N', 'M', ',', '#'} | |
| }; | |
| // Keymap if Function-Shift pressed | |
| // NEXT key read should be from this table | |
| byte keyMapAlt[NUM_ROWS][NUM_COLS] = | |
| { | |
| {KEY_LEFT_ARROW, '}}', '{{', ']', '['}, | |
| {'=', '$', '(', ')', '""'}, | |
| {KEY_DOWN_ARROW, KEY_UP_ARROW, KEY_RIGHT_ARROW, '!', KEY_BACKSPACE}, | |
| {0, '_', '~', '|', '@'}, | |
| {'>', '$', '(', ')', '""'}, | |
| {'/', '?', ';', ':', 0}, | |
| {'*', '-', '+', '=', KEY_RETURN}, | |
| {'*', '<', '>', '\'', '#'} | |
| }; | |
| // Global Variables | |
| int debounceCount[NUM_ROWS][NUM_COLS]; | |
| int altKeyFlag; | |
| // Define the row and column pins | |
| byte colPins[NUM_COLS] = {13, 12, 11, 10, 9}; | |
| byte rowPins[NUM_ROWS] = {7, 6, 5, 4, 3, 2, 1, 0}; | |
| // SETUP | |
| void setup() | |
| { | |
| // Set all pins as inputs and activate pull-ups | |
| for (byte c = 0 ; c < NUM_COLS ; c++) | |
| { | |
| pinMode(colPins[c], INPUT); | |
| digitalWrite(colPins[c], HIGH); | |
| // Clear debounce counts | |
| for (byte r = 0 ; r < NUM_ROWS ; r++) | |
| { | |
| debounceCount[r][c] = 0; | |
| } | |
| } | |
| // Set all pins as inputs | |
| for (byte r = 0 ; r < NUM_ROWS ; r++) | |
| { | |
| pinMode(rowPins[r], INPUT); | |
| } | |
| // Function key is NOT pressed | |
| altKeyFlag = ALT_KEY_OFF; | |
| // Initialise the keyboard | |
| Keyboard.begin(); | |
| } | |
| // LOOP | |
| void loop() | |
| { | |
| bool shifted = false; | |
| bool keyPressed = false; | |
| // Check for the Shift key being pressed | |
| pinMode(rowPins[SHIFT_ROW], OUTPUT); | |
| if (digitalRead(colPins[SHIFT_COL]) == LOW) shifted = true; | |
| if (shifted == true && altKeyFlag == ALT_KEY_ON) | |
| { | |
| // NOP to prevent Function selection from autorepeating | |
| } | |
| else | |
| { | |
| pinMode(rowPins[SHIFT_ROW], INPUT); | |
| for (byte r = 0 ; r < NUM_ROWS ; r++) | |
| { | |
| // Run through the rows, turn them on | |
| pinMode(rowPins[r], OUTPUT); | |
| digitalWrite(rowPins[r], LOW); | |
| for (byte c = 0 ; c < NUM_COLS ; c++) | |
| { | |
| if (digitalRead(colPins[c]) == LOW) | |
| { | |
| // Increase the debounce count | |
| debounceCount[r][c]++; | |
| // Has the switch been pressed continually for long enough? | |
| int count = debounceCount[r][c]; | |
| if (count == DEBOUNCE_VALUE) | |
| { | |
| // First press | |
| keyPressed = true; | |
| pressKey(r, c, shifted); | |
| } | |
| else if (count > DEBOUNCE_VALUE) | |
| { | |
| // Check for repeats | |
| count -= DEBOUNCE_VALUE; | |
| if (count % REPEAT_DELAY == 0) | |
| { | |
| // Send repeat | |
| keyPressed = true; | |
| pressKey(r, c, shifted); | |
| } | |
| } | |
| } | |
| else | |
| { | |
| // Not pressed; reset debounce count | |
| debounceCount[r][c] = 0; | |
| } | |
| } | |
| // Turn the row back off | |
| pinMode(rowPins[r], INPUT); | |
| } | |
| digitalWrite(rowPins[SHIFT_ROW], LOW); | |
| } | |
| } | |
| void pressKey(byte r, byte c, bool shifted) | |
| { | |
| // Send the keypress | |
| byte key = shifted ? keyMapShifted[r][c] : keyMap[r][c]; | |
| if (key == KEY_F5) | |
| { | |
| // If the Function key pressed (Shift + New Line) | |
| altKeyFlag = ALT_KEY_ON; | |
| key = 0; | |
| debounceCount[r][c] = 0; | |
| } | |
| if (altKeyFlag == ALT_KEY_ON) | |
| { | |
| // Get the Alt key pressed after Function has been selected | |
| key = keyMapAlt[r][c]; | |
| altKeyFlag = ALT_KEY_OFF; | |
| } | |
| // send the key | |
| if (key > 0) Keyboard.write(key); | |
| } |
It’s still not ideal. The ZX81 had one-button command entry – press ‘Y’, for instance, and the RETURN command appeared on the screen. The Leonardo code currently sends just a single character back to the host, but it ought to be a straightforward process to send a sequence of characters and so auto-type a Linux command. It will be harder to add extra modifier keys, but necessary. I used nano to edit a Python script. Fine, I could use the ZX81 to delete lines, type in new ones and change characters – but with no Ctrl key, I couldn’t save the changes.
So work remains to be done, then, but it shows the Pi can (largely) be controlled using the ZX81 keyboard. With the Pi in place, you can always hook up a separate USB keyboard, of course, though that defeats the object of the exercise.
I’ll tackle getting the Pi into the space-restricted ZX81 case when my second-hand Sinclair arrives. Watch out for Part 2.

Pingback: Mettez un Raspberry Pi dans votre Amiga - Essentiel Xibar
Thought I would have a go at this as I had an old zx81 case, and a raspberry pi 2. Used a Pro Micro ATmega32U4 Leonardo Arduino IDE 1.0.3 Bootloader on pins TX0, RX1, 2, 3, 4, 5, 6, 7 and 9, 10, 16, 14,15. I changed line 70 of code to use these pins ( byte colPins[NUM_COLS] = {13, 14, 16, 10, 9 }; ), normal keys and shift work however can not seem to get Function to work. When shift and newline keys pressed just acts as return key. As I’ am new to this Arduino stuff and the raspberry pi any help would be most apreciated.
I think you may be misunderstanding the use of the ZX81’s shift key here. In your code above a normal keypress is interpreted as lower case letters, and you’re using shift to indicate capital letters, but on a real ZX81 there were only upper case letters – so a K was a ‘K’ and Shift-K was the + symbol.
Shift-Newline engaged FUNCTION mode (which is why “function” is written on the key in red) and in that mode the K key would have returned the keyword LEN. Function mode was never used to access the shifted characters – that would have been hideous.
Admittedly it’s a reasonable compromise if you really feel that you must use the shift key for changing upper and lower case, but it does still make typing symbols rather more awkward than on the real thing.
Very interesting, thanks!
Very Nice..
Interesting! is there a way then thats similar or rather what i’m trying to ask is can a Psion 5 keyboard be used with a Raspberry Pi in a similar way?
Looking at a picture of the Series 5’s keyboard on eBay (not worth buying to use; there’s a missing key), there doesn’t seem any obvious reason why you couldn’t apply the same technique.
You’d need to get the keyboard, find a suitable connector that can be soldered directly onto the Arduino or wired to it, and then begin polling the rows and columns of the keyboard, the way Dave’s software does. Some of the lines of the cable will be key rows, others key columns. And with a Ctrl key, you’d have a more suitable keyboard for Pi work than the ZX81’s.
It would be cheaper if you could connect the keyboard directly to the Raspberry Pi GPIO-ports, but now I suppose you have a general ZX81 USB-keyboard.
I did think of that, but decided against it for several reasons. First, it would require a driver, which is not the easiest of programs to write. More importantly, I use the GPIO frequently, so I wanted to keep it free for other Pi add-ons. It’s more costly to use USB, for sure, but more convenient.