
I’ve always had a soft spot for Sinclair’s ZX Printer. Yes it was slow and the print was poorly rendered on its special aluminium-coated paper, which picked up greasy fingerprints like they were going out of fashion, but it was cute, compact and cheap.

Source: Carlos Pérez Ruiz
I never owned one – I didn’t have a Sinclair computer back then – but I’ve always liked the idea of having a small thermal printer for listings and such. I do have a Raspberry Pi, and it struck me that a cheap, compact thermal printer would be ideal for this mini microcomputer too. Being a Pi user, of course, hooking up a printer isn’t about plugging in a USB cable and running CUPS it’s about driving the device directly through code and the Pi’s GPIO ports.
I did a search for a suitably small and low-cost printer and quickly uncovered this little – 111 x 65 x 57cm – fellow from SparkFun, available from various retailers in the UK for around £40, including Hobbytronics and Proto-Pic.
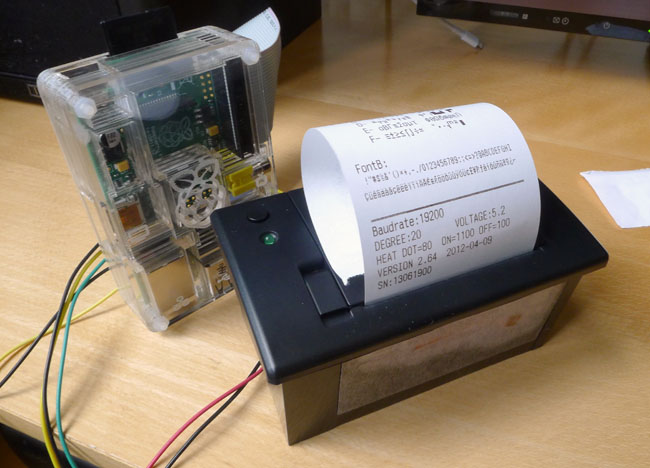
It’s basic and it only takes a narrow cash register paper, but it’s inexpensive. Designed to be integrated into some other hardware, doesn’t come with a convenient USB cable. Instead, there are two cables in the box – ‘collections of wires’ would be a better description – each capped with a block connector for the printer and a block connector for the device you’ll be printing from. I’d say with a bit of wiring they could together support a single USB connector if you want to connect the printer that way.
I was forewarned of the printer’s wires-only approach by a Geek Gurl Diaries blog, which used the printer in a project. My original plan was to cut off one connector, clip the live and ground wires into a solder-less DC barrel connector and hook it up to a new AC adaptor. But to avoid a trip to Maplin, I thought I’d see if I anything at home I could use instead. There was: a spare USB extension cable and a USB AC adaptor with a 5.2V output.

USB cables have a black ground wire and a red power line, so it was the matter of a moment to remove the female connector from the extension cable, cut away the shielding and the green and yellow data wires, and mate the cable’s red and black wires with the red and black power wires that come with the printer. The USB wires were particularly thin, but I used the DC barrel adaptor I’d already bought to connect the two cables securely together.
A botch, to be sure, but it worked. If you plan to put the printer inside another box, you can probably leave the cable as it is, but I think I’ll eventually pick up a pre-made USB-to-DC barrel cable, which will make for a tidier connection.

 The solder-less DC barrel handily holds the USB cable and printer power wires together
For now, though, the printer has sufficient power to experiment with. You can start by pressing the printer’s line feed button down as you switch on the power: this forces the printer to churn out a test print.
The printer’s second cable is for data: the Pi uses the yellow (3.3V in) and black (ground) wires, but don’t attempt to connect the green (5V out) wire as it’ll blow your Raspberry. Since you don’t need the printer to talk to the Pi – we just want the Pi to talk to the printer – leaving the green wire disconnected is not a problem.
A pair of male-to-female prototyping wires can be used to hook the printer’s data cable connector to the Pi’s GPIO ports: pin 6 (GND) for the ground (black) connection and pin 8 (UART Tx) for the data (yellow).

 The ground (black) and UART Rx (yellow) wires from the printer’s data line go into the Pi’s CPIO pins 6 and 8, respectively. Remember, DO NOT connect the green cable
To set the Pi to talk to the printer, you need to re-configure the Pi’s serial GPIO ports from the default settings. Edit /etc/inittab using your preferred text editor – I use Nano, thus: sudo nano /etc/inittab – and find the following line:
T0:23:respawn:/sbin/getty -L ttyAMA0 115200 vt100Add a # symbol at the start so the line is ignored when the OS reads the file at start-up – you turn the line from a command to a comment – then save the file.
Next edit /boot/cmdline.txt and find the line dwc_otg.lpm_enable=0 console=ttyAMA0,115200 kgdboc=ttyAMA0,115200 console=tty1 root=/dev/mmcblk0p2 rootfstype=ext4 elevator=deadline rootwait
Duplicate this line, and then remove console=ttyAMA0,115200 kgdboc=ttyAMA0,115200 from the copy. Now add a # to the first line. This way you can easily switch between default and custom version of the line simply by swapping the # from one line to the other.
Now reboot your Pi with the command:
sudo shutdown -r nowTo use the printer in your Python programs, you need to install Python’s serial module, python-serial, using the following command:
sudo apt-get install python-serial
Now head over to Lauri Kainulainen’s page on the Github website: github.com/luopio/py-thermal-printer. Lauri has written a Python module, printer.py, that takes a lot of the work out of sending control codes and such to the printer. Download the code’s Zip file to your home folder and unpack it with
unzip py-thermal-printer-master.zipI made a directory called Piprint first and put the printer.py and the file example-lammas.png into that. Wherever you save it, open up an LXTerminal window and navigate to the location and enter this command:
chmod 777 printer.pyThis makes the script executable from the command line, and you can test this – and the printer – byentering and running:
./printer.pywhich will print out a test page.
Actually it won’t, at least not entirely, because it requires the python-imaging-tk module in order to output a sample bitmap image. You can install the module, if you wish, by entering:
sudo apt-get install python-imaging-tk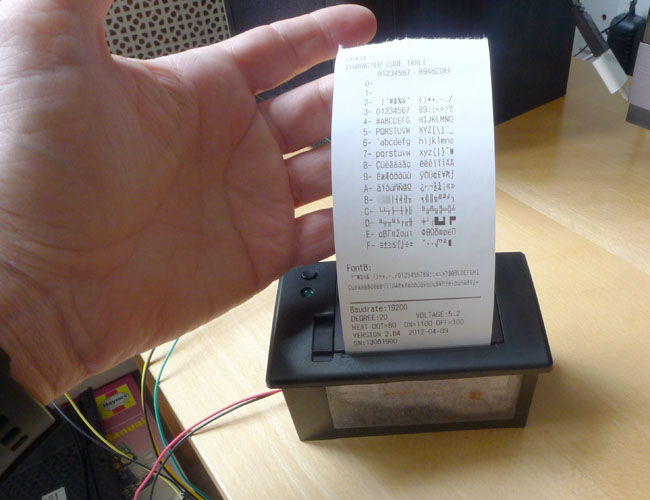
You don’t need python-imaging-tk just to print out text and graphical glyphs, only images. Whether you install it or not, you can add import printer to the start of your own Python programs to print from within them. The printer can only output 32 characters on each line using the standard font, ‘A’ – 40 with the smaller, alternative font, ‘B’ – so it’s useful to import the textwrap module to make use of its text handing routines. For instance:
import printer, textwrap

base_text = "This is a very long line of text which will almost certainly not fit on a single print line."

wrapped_text = textwrap.fill(base_text, 32)

p = printer.ThermalPrinter(serialport="/dev/ttyAMA0")
p.print_text(wrapped_text)
p.linefeed()
You can use the sys to get characters entered by the user at the keyboard:
import printer, textwrap, sys

p = printer.ThermalPrinter(serialport="/dev/ttyAMA0")

base_text = sys.stdin.read()
wrapped_text = textwrap.fill(base_text, 32)

p.print_text(wrapped_text)
p.linefeed()
Incidentally, if you don’t want to use printer.py, it’s not hard to control the printer using its own commands, each triggered with an ESC character – chr(27) in Python. You can download a full list of the printer’s commands here (PDF). However, Printer.py masks these codes with easy-to-remember command words.
So, if you’ve define a variable p as per the Python program above,
p.bold_on()turns on bold printingp.bold_off()turns it offp.font_b_on()activates the alternative, small fontp.font_b_off()brings back the main, large fontp.justify("R"), p.justify("C")andp.justify("L")aligns the text, respectively, right, centred and leftp.upsidedown_on()turns on upside down printingp.upsidedown_off()turns it offp.underline_on()starts underlining charactersp.underline_off()stops the underlinep.inverse_on()prints characters white on blackp.inverse_off()sets character printing back to black on white
Those are the key text commands. Look through printer.py and you’ll see commands to format and output barcodes too, along with bitmap image printing. There are also routines to interpret text with markup commands and print it accordingly.
And here is the first draft of a simple Python program to replicate the Basic LPRINT command, or equivalent, to print out your programs:
import printer, fileinput

p = printer.ThermalPrinter(serialport="/dev/ttyAMA0")

for line in fileinput.input():
    p.print_text(line)

p.linefeed()
p.linefeed()
p.linefeed()
Save it as lprint.py. Run it with sudo lprint.py my_app.py


Hello 🙂
first thanks for your great tutorial… it made many things easier to me and i got the printer working and hes printing well. i only have one Problem. i print in german and use letters like ü ä ö and the printer cant handle this. do u have any idea what to change so my printer prints these letters?
thank you and best wishes 🙂
The printer does support German characters: you basically send 0x1B5202 to the printer (ESC + R + 2) via the serial line. The printer.py library doesn’t do this itself, but you could try and add the following function to the library, and call that:
def country(self, country=0):
# 0 = USA, 1 = France, 2 = Germany, 3 = UK etc.
self.printer.write(self._ESC)
self.printer.write(chr(82))
self.printer.write(chr(country))
The error message I get is File “/home/pi/pgms/adaqrcode.py”, line 8 width 135
The call for the 75 x 75 bitmap in printertest.py looks like
# Print the 75×75 pixel logo in adalogo.py
#import gfx.adalogo as adalogo
import adalogo as adalogo
printer.printBitmap(adalogo.width, adalogo.height, adalogo.data)
and the beginning of the bitmap looks like
width = 75
height = 75
data = [
0x00,0x00,0x00,0x00,0x00,0xe0,0x00,0x00,0x00,0x00,
0x00,0x00,0x00,0x00,0x01,0xf0,0x00,0x00,0x00,0x00,
The call to print the 135 x 135 bitmap looks like
# Print the 135×135 pixel QR code in adaqrcode.py
#import gfx.adaqrcode as adaqrcode
import adaqrcode as adaqrcode
printer.printBitmap(adaqrcode.width, adaqrcode.height, adaqrcode.data)
#printer.println(“Adafruit!”)
#printer.feed(1)
and the beginning of the bitmap looks like
# ——————————————————————————
# 135 x 135 Adafruit QR Code
#——————————————————————————
#static unsigned char __attribute__ ((progmem)) adaqr [] = {
#static __attribute__ ((progmem)) adaqr [] = {
#static ((progmem)) adaqr [] = {
width 135
height 135
adaqr = [
I commented out the original statements and inserted the same type as the smaller bitmap, trying to get it to work, but it never did. If something is obvious to you, please tell me, but don’t go to any trouble. I doubt that I will ever need any big bitmaps. I only plan to use the printer for occasionally logging events in my twin magnetometer driveway alarm system.
Very impressed with the quality of the Tutorial ! I happened to start with the Adafruit_Thermal.py and printertest.py Adafruit provided. I have all the print variations working except a 135 x 135 bitmap. The 75 x 75 bitmap prints. Do you happen to know if there is a restriction on bitmap size ?
I can’t see anything in the code that might cause problems at 135×135. Images larger than 384 in width are rejected; smaller images are padded to 384. Sounds to me like it might be an quirk in the specific image you’re using?
Hello! I would like to ask if you have tutorial on how to install this printer in Rasbpian Jessie. Jessie has no /etc/inittab. I would really appreciate your help. Thank you!
Erica, under Jessie you can use ‘sudo raspi-config’ to stop kernel and log-in messages being sent via serial. Just go to ‘Advanced Options’ and then select ‘Enable/Disable shell and kernel messages on the serial connection’. if you select ‘No’ at the next screen, and then reboot the Pi, the serial port should be free for the printer.
This is the greatest tutorial I’ve seen so far on how to use the thermal printer from raspberry pi….I’ve been looking for days and I finally found it. THANK YOU SO MUCH, keep it up buddy
Pingback: Mini Thermal Printer – CreativPi
Hello Agus Toklik !
Print test page and look BAUDRATE, 9600 or 19200.
Verify on your script python the baudrate, and change his ! ( Line 51 )
hi, i’m followed your tutorial, but when i’m run the program, the printout is chinese character, do you know how to change the character set ?
Hi. i followed your steps and some info from Adafruit and the printer works like a charm. no i pleaseeeee need your help to edit the python script that is used in some examples please . i downloaded it from github on the python thermal printer test repo. please tell me what i am doing wrong below.
if the button on the printer is tapped (4th line from the bottom) then i want to try and run a script and stay within the loop until HOLD triggered
while(True):
# Poll current button state and time
buttonState = GPIO.input(buttonPin)
t = time.time()
# Has button state changed?
if buttonState != prevButtonState:
prevButtonState = buttonState # Yes, save new state/time
prevTime = t
else: # Button state unchanged
if (t – prevTime) >= holdTime: # Button held more than ‘holdTime’?
# Yes it has. Is the hold action as-yet untriggered?
if holdEnable == True: # Yep!
hold() # Perform hold action (usu. shutdown)
holdEnable = False # 1 shot…don’t repeat hold action
tapEnable = False # Don’t do tap action on release
elif (t – prevTime) >= tapTime: # Not holdTime. tapTime elapsed?
# Yes. Debounced press or release…
if buttonState == True: # Button released?
if tapEnable == True: # Ignore if prior hold()
tap() # Tap triggered I WANT TO ADD MY CODE HERE su ./myscript.sh
tapEnable = False # Disable tap and hold
holdEnable = False
tapEnable = True # Enable tap and hold actions
holdEnable = True
trying this to print out from a Pi 2 It seems to work but I get no printout. Instead I get the following
Testing printer port on /dev/ttyAMA0
Bitmap size 384
=> single channel
output saved to print-output-png
This looks like it is testing to program to see if everything is working and then outputs a png file to the pi. But nothing is printed on the printer. how can I stop the test print and make it actually output to the printer?
Cheers
Hi, I just try your code :
import printer, textwrap
but the result say : import : command not found
can you help me, where should i get the printer and textwrap module ?
Thanks
Hi
When i run the python script, whatever is send to print “unreadable characters are been printed”. When i decode the characters , those characters belong to Chinese and the characters are picked up from the PC437 code page(thermal printer user manual).
Any idea why this happens. Or any serial port configuration i need to change on my board.
Also using the B+ and can’t get it to work. No error messages. Any clues how to debug this?
@Markus (and @Nairuz, earlier): I’ve just tried this fresh on my own B+ – the original article was written on a B – and it worked first time. When you enter
./printer.pyat the command line, you should get some message, error or otherwise. I getTesting printer on port /dev/ttyAMA0, for example.Things to check:
Hi , I am using Raspberry B+ model , I followed your instructions, but the printer did not print out anything . What could be the problem ??
I’ve used a different manual and connected both console and power to the RPI itself, but I got these annoying reboots as soon as I tired to print anything… when I read your post I figured it’s the power, and hooked it up to the PC with a USB cable – works like a charm now. 🙂
Thanks!
Hello, a very good tuto.
Have you ever printed a text with a big font size?
thanks!
daniel
Good question, Daniel. Check out my latest post.